GitHub Actions Auto-Deployment
GitHub Actions is the most recommended deployment method, enabling automatic deployment upon code push—completely free and highly efficient.
Deployment Advantages
- ✅ Completely Free: Utilizes Cloudflare and GitHub’s free tiers
- ✅ Automated: Deploys automatically upon code push
- ✅ Global Acceleration: Cloudflare CDN with global nodes
- ✅ High Availability: 99.9% service uptime
- ✅ HTTPS: Automatic HTTPS certificates
Deployment Architecture Selection
CloudPaste offers two deployment architectures to choose from, flexibly configured based on different needs and use cases.
🔄 Unified Deployment (Recommended)
Frontend and backend deployed on the same Cloudflare Worker
✨ Advantages:
- Same Origin - No CORS issues, simpler configuration
- Lower Cost - Navigation requests are free, saving 60%+ costs compared to separated deployment
- Simpler Deployment - Deploy frontend and backend in one go, no need to manage multiple services
- Better Performance - Frontend and backend on the same Worker, faster response time
🔀 Separated Deployment
Backend deployed to Cloudflare Workers, frontend deployed to Cloudflare Pages
✨ Advantages:
- Flexible Management - Independent deployment, no mutual interference
- Team Collaboration - Frontend and backend can be maintained by different teams
- Scalability - Frontend can easily switch to other platforms (e.g., Vercel)
Prerequisites
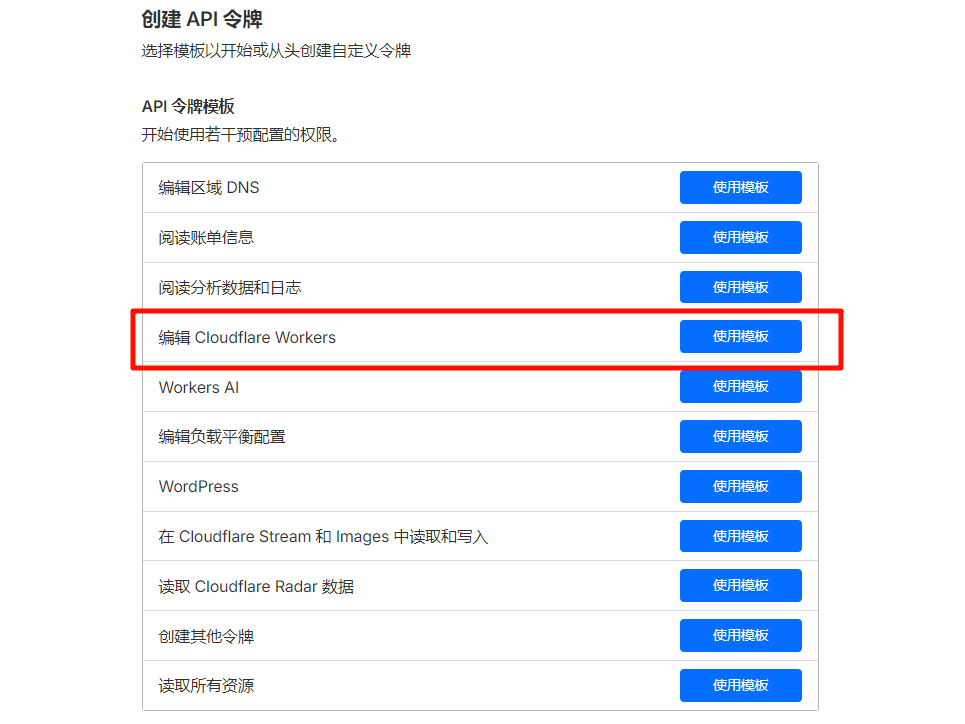
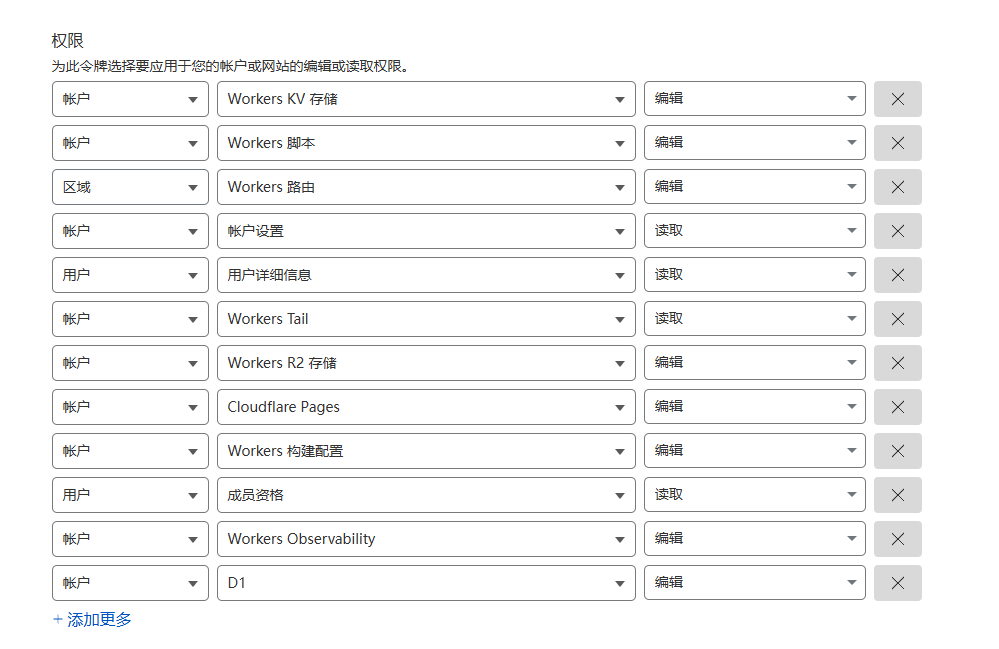
1. Obtain Cloudflare API Information
API Token
- Visit the Cloudflare Dashboard
- Create a new API token
- Select the "Edit Cloudflare Workers" template and
add D1 database edit permissions(D1 is not included by default and must be added manually)
Account ID
Your Account ID can be found in the right sidebar of the Cloudflare dashboard.
2. Fork the Repository
Visit the CloudPaste repository and click the Fork button.
Configure GitHub Repository
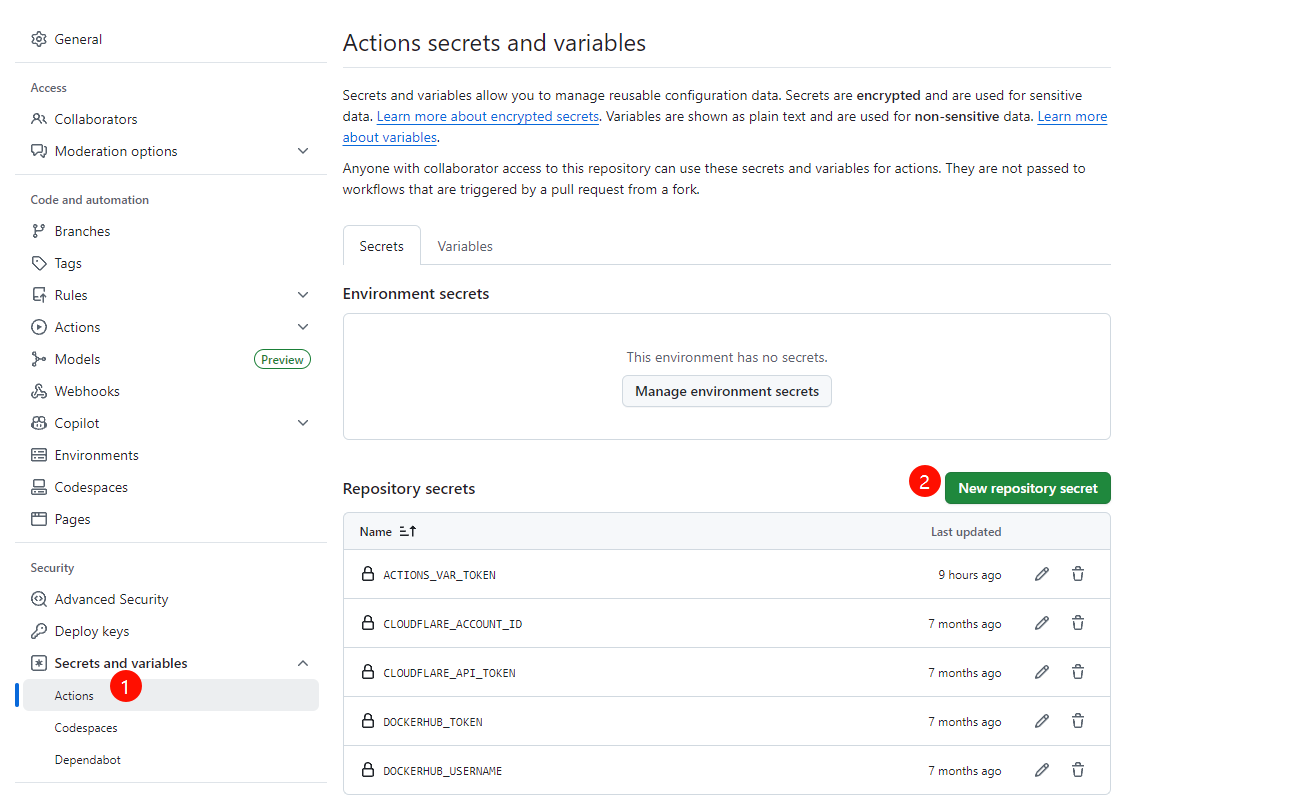
1. Configure GitHub Secrets
In your forked repository, go to Settings → Secrets and variables → Actions → New repository secret and add the following secrets:
| Secret Name | Required | Purpose |
|---|---|---|
CLOUDFLARE_API_TOKEN | ✅ | Cloudflare API token (requires Workers, D1, and Pages permissions) |
CLOUDFLARE_ACCOUNT_ID | ✅ | Cloudflare account ID |
ENCRYPTION_SECRET | ❌ | Key for encrypting sensitive data (will be auto-generated if not provided) |
ACTIONS_VAR_TOKEN | ✅ | GitHub Token for deployment control panel (required only when using the control panel, otherwise skip) |
2. (Optional) Configure Deployment Control Panel
If you want to use the visual control panel to manage auto-deployment switches, you need additional configuration:
Create GitHub Personal Access Token:
Visit GitHub Token Settings
Click Generate new token → Generate new token (classic)
Set Token name (e.g.,
CloudPaste Deployment Control)Select permissions:
- ✅ repo (Full repository access)
- ✅ workflow (Workflow permissions)
Click Generate token
Copy the Token and save as Secret
ACTIONS_VAR_TOKENFill in the corresponding repository key as shown in the figure
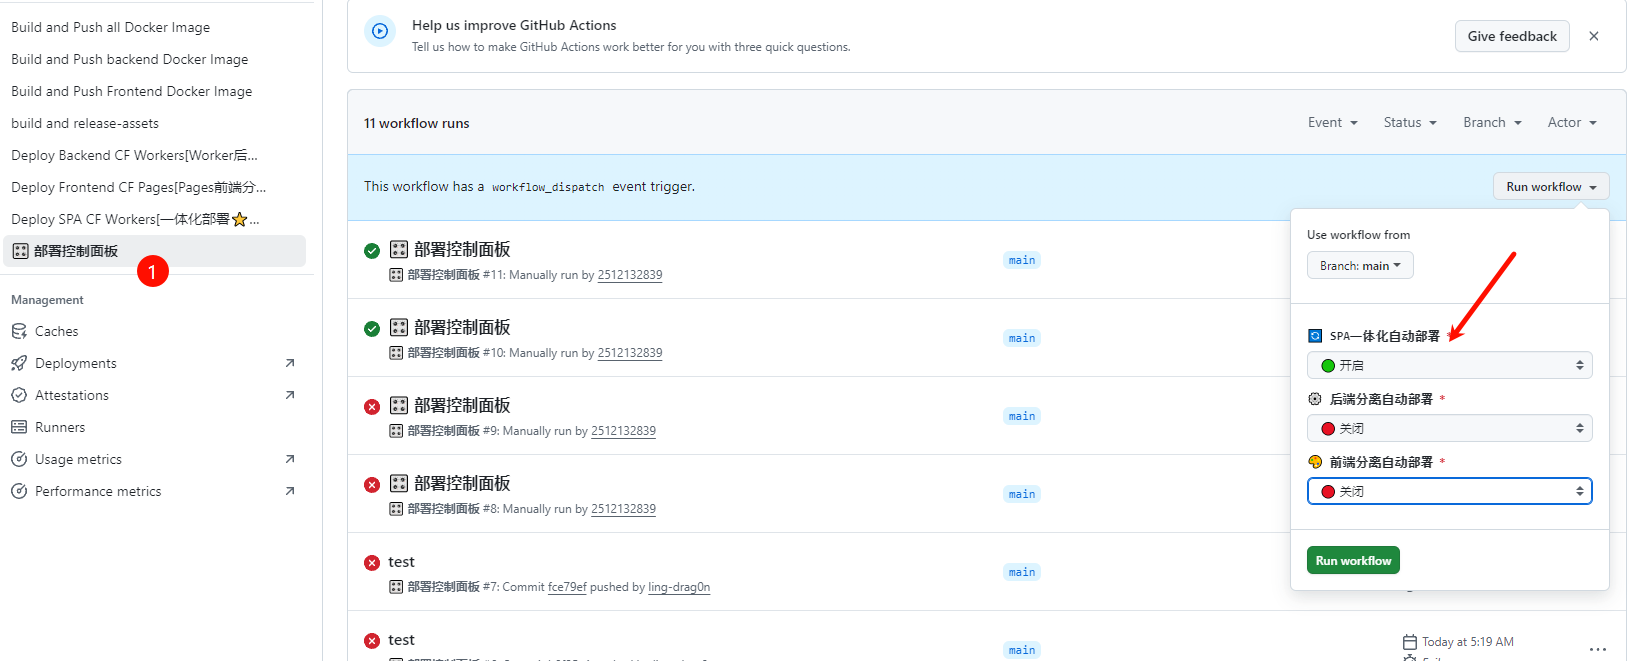
Using the Control Panel:
- Go to repository Actions tab
- In the left workflow list, click 🎛️ Deployment Control Panel
- Click Run workflow → Run workflow on the right
- In the popup, select the deployment method to enable/disable
- Click Run workflow to apply configuration
- After updating the switch state, the control panel will automatically trigger the corresponding deployment workflow once (whether it actually deploys is decided by the current switch state)
- As shown in the figure: The figure shows the deployment method with only Worker front-end and back-end integration enabled
🔄 Unified Deployment Tutorial (Recommended)
Deployment Steps
1️⃣ Configure GitHub Secrets
Refer to the "Configure GitHub Repository" section above to complete the configuration.
2️⃣ Trigger Deployment Workflow
Method 1: Manual Trigger (recommended for first deployment)
- Go to repository Actions tab
- Click Deploy SPA CF Workers[一体化部署] on the left
- Click Run workflow on the right → select
mainbranch → Run workflow
Method 2: Auto Trigger
- Use the deployment control panel to enable SPA Unified Auto Deploy
- After that, deployment will be triggered automatically when pushing code to
frontend/orbackend/directory tomainbranch
Note
When you manually run Deploy SPA CF Workers[一体化部署] from the Actions page, it will always deploy once regardless of the auto-deploy switch. Automatic behavior (push or control panel triggered) is still controlled by the SPA_DEPLOY switch.
3️⃣ Wait for Deployment to Complete
The deployment process takes about 3-5 minutes. The workflow will automatically complete the following steps:
- ✅ Build frontend static assets
- ✅ Install backend dependencies
- ✅ Create/verify D1 database
- ✅ Initialize database schema
- ✅ Set encryption secret
- ✅ Deploy to Cloudflare Workers
After successful deployment, you will see output similar to this in the Actions log:
Published cloudpaste-spa (X.XX sec)
  https://cloudpaste-spa.your-account.workers.dev
Deployment Complete
Visit your application: https://cloudpaste-spa.your-account.workers.dev
Post-deployment Configuration:
- The database will be automatically initialized on first visit
- Log in with the default admin account:
- Username:
admin - Password:
admin123
- Username:
- ⚠️ Important: Change the default admin password immediately!
- Configure your S3/WEBDAV-compatible storage service in the admin panel
- (Optional) Bind a custom domain in Cloudflare Dashboard
Advantages Recap:
- ✅ Same origin for frontend and backend, no CORS issues
- ✅ Navigation requests are free, reducing costs by 60%+
- ✅ Deploy in one go, simple management
🔀 Separated Deployment Tutorial
If you choose separated deployment, follow these steps:
Backend Deployment
1️⃣ Configure GitHub Secrets
Refer to the "Configure GitHub Repository" section above to complete the configuration.
2️⃣ Trigger Backend Deployment
Method 1: Manual Trigger
- Go to repository Actions tab
- Click Deploy Backend CF Workers[Worker后端分离部署] on the left
- Click Run workflow → Run workflow
Method 2: Auto Trigger
- Use the deployment control panel to enable Backend Separated Auto Deploy
- Deployment will be triggered automatically when pushing
backend/directory code
3️⃣ Wait for Deployment to Complete
The workflow will automatically complete:
- ✅ Create/verify D1 database
- ✅ Initialize database schema
- ✅ Set encryption secret
- ✅ Deploy Worker to Cloudflare
4️⃣ Record Backend URL
After successful deployment, note down your backend Worker URL: https://cloudpaste-backend.your-account.workers.dev
Important
Remember your backend domain, you'll need it for frontend deployment!
Frontend Deployment
1️⃣ Trigger Frontend Deployment
Method 1: Manual Trigger
- Go to repository Actions tab
- Click Deploy Frontend CF Pages[Pages前端分离部署] on the left
- Click Run workflow → Run workflow
Method 2: Auto Trigger
- Use the deployment control panel to enable Frontend Separated Auto Deploy
- Deployment will be triggered automatically when pushing
frontend/directory code
Note
When you manually run the Backend or Frontend deployment workflows from the Actions page, they will always deploy once regardless of the auto-deploy switch. Automatic behavior is controlled by the BACKEND_DEPLOY / FRONTEND_DEPLOY switches.
2️⃣ Configure Environment Variables
Required step: After frontend deployment, you must manually configure the backend address!
- Log in to Cloudflare Dashboard
- Navigate to Pages → cloudpaste-frontend
- Click Settings → Environment variables
- Add environment variable:
- Name:
VITE_BACKEND_URL - Value: Your backend Worker URL (e.g.,
https://cloudpaste-backend.your-account.workers.dev) - Note: No trailing
/, custom domain recommended
- Name:
Important
Must fill in the complete backend domain, format: https://xxxx.com
3️⃣ Redeploy Frontend
Important: After configuring environment variables, you must run the frontend workflow again!
- Return to GitHub Actions
- Manually trigger Deploy Frontend CF Pages workflow again
- This is necessary to load the backend domain configuration
4️⃣ Access Application
Frontend deployment URL: https://cloudpaste-frontend.pages.dev
Note
Please strictly follow the steps, otherwise backend domain loading will fail!
Verify Deployment
1. Check Backend Service
Access your backend URL—you should see an API response:
curl https://your-backend-url.workers.dev/api/health2. Check Frontend Service
Visit your frontend URL—the CloudPaste interface should appear.
3. Test Functionality
- Log in with the default admin credentials:
- Username:
admin - Password:
admin123
- Username:
- Create a test text entry
- Upload a test file
File Upload Configuration
If you need file upload functionality, configure S3 storage and CORS settings first—otherwise, uploads will fail.
Key Notes:
- Cloudflare R2 requires CORS rules
- Other S3 services also need CORS configuration
- File uploads will only work after configuration
Common Issues
Deployment Failure
Issue: GitHub Actions workflow fails
Solution:
- Verify API token permissions
- Confirm Account ID is correct
- Check workflow logs for detailed errors
Frontend Cannot Connect to Backend
Issue: Frontend shows network errors
Solution:
- Ensure the backend URL is correct
- Check if the backend is running
- Verify environment variable configuration
Accessibility Issues in China
Issue: .workers.dev domains are inaccessible in China
Solution:
- Use a custom domain
- Deploy via a China-friendly CDN
- Consider Docker deployment
Auto-Updates
After setup, services will auto-update upon pushing to the main branch:
- Changes in
backend/trigger backend deployment - Changes in
frontend/trigger frontend deployment